Showing posts with label Lesson Plans. Show all posts

Wednesday, October 12, 2016

The Moderate/Severe Population: Structuring Therapy Sessions

Over the years, I've realized that when working with students in my Mod/Severe classes, my sessions are most successful when they include several parts that we can "check-off" on an agenda, visual schedule, etc. This is most necessary for my students with behaviors who have limited attention and need to constantly be looking towards the next activity. For example, here's a re-usable visual schedule I use with a student who has particular difficulty attending to tasks for more than a minute or two.

Thus, the clinical question I realized I needed to answer was this: what activities can I do with my Mod/Severe students to break-up an otherwise long, single activity?

What Do My Mod/Severe Sessions Look Like?

My Rules ~ 1 - 2 minutes
As I mentioned in my very first post about working with this population, I always start out by quickly going over the "rules" to get everyone in the mindset of participating and focusing on their good speech strategies. You can find my rule sheet here, although I have recently been contemplating updating it to include an AAC rule since I have several new AAC users this year.

Warm-Up ~ 3 - 7 minutes
I like to do some sort of quick activity to get my students talking and ready to engage in the main activity for the day.
- For my lowest-functioning class, I use the free "Touch and Say" app and open different pages for different students: the "silly" page for students working on imitation, "feel" page to quickly target some emotions, or "color" to work on some basic functions. It may look juvenile with the little mouse-looking creature, but on the actual pages there is no mouse, just a solid color with a "Nick Jr."-esque face. It ends up being much more neutral than some of my students other preferred interests (e.g. Thomas the Train, Dora, etc.).


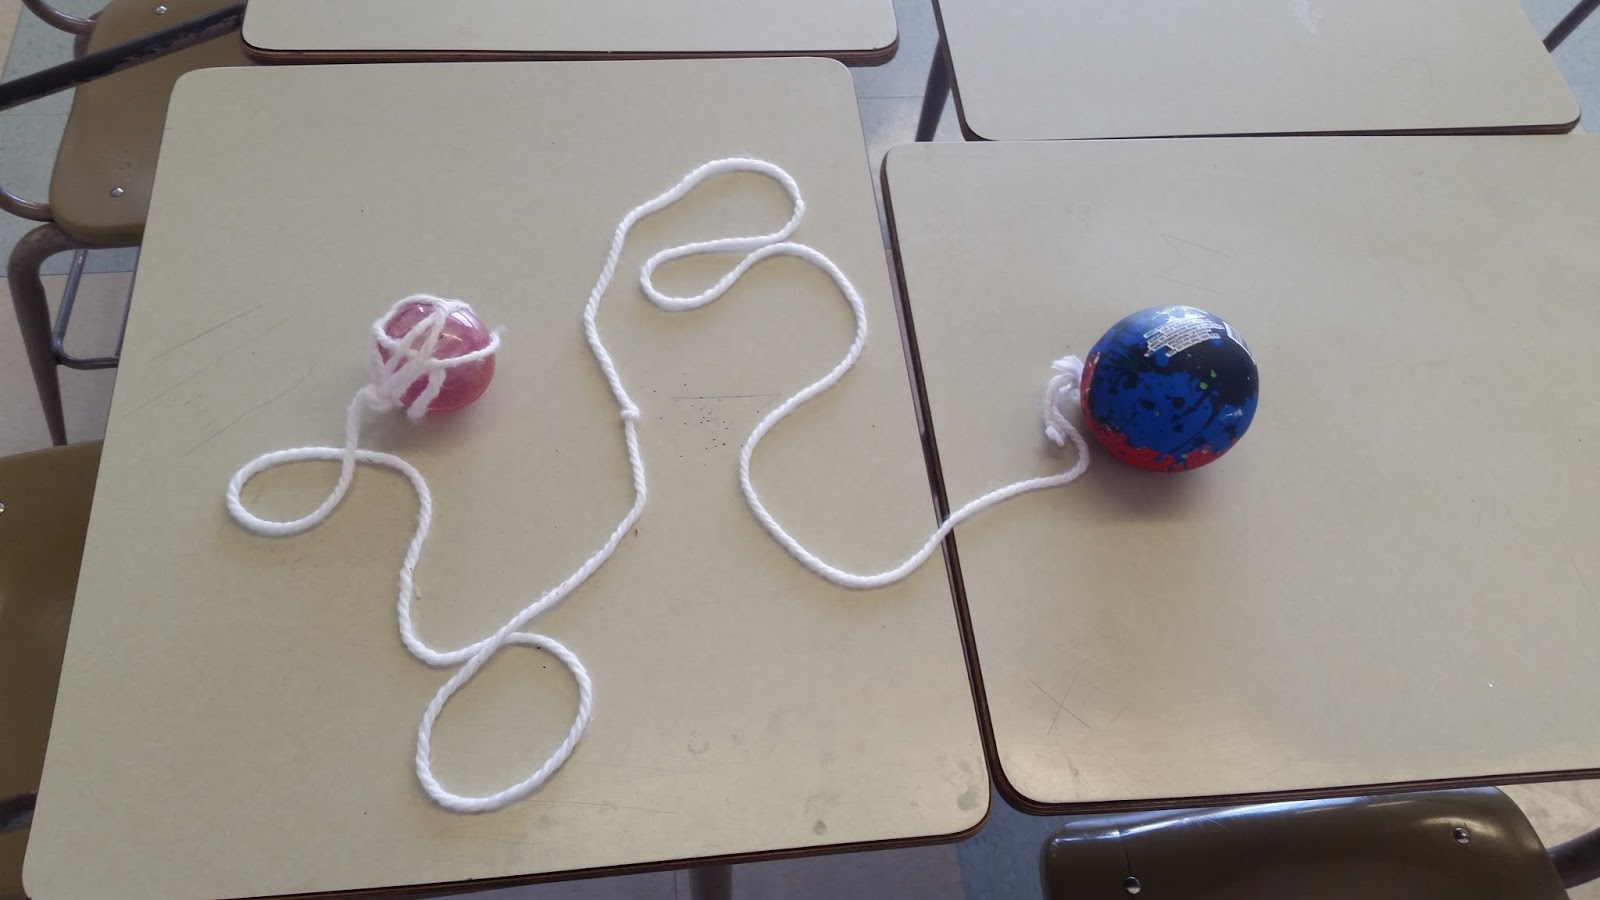
- For my higher functioning classes, I created the "Conversation Balls." Essentially, it's two dollar store balls (one big, one small) that I hot-glued a long string between to connect. The game is played by selecting a student who gets the big ball and a target prompt (e.g. "What did you do over the weekend?" or "What's your favorite food?"). The student then throws the small ball to a peer and asks them them target question. The string connects the two balls, serving as a good reminder for students to use eye contact and face their conversational partner. After the student with the big ball makes a comment, the student who had the small ball selects someone else to be their partner and then they receive the big ball. I prompt as needed for the students to make comments, ask/answer questions, etc as the balls get passed around the room between all the students.

**For some groups, the conversation ball can be so time consuming that it can take up an entire session; it really depends on how well your students can ask and answer questions**

- If an exciting topic has recently happened, such as Christmas or summer vacation, I may just ask the students to go around and each share one thing that's on their minds. They get to practice their language skills (because most of their day is spent in total silence!) and I get to learn more about their lives! It's a win-win.

Main Activity ~ 15 min - 25 min
You can check out some of my "main activities" that I have posted about in the past here and here. You can also check out my blog post here where I describe some of my favorite "off-the-shelf" materials, some of which I have used with my higher-functioning Mod/Severe students as "main activities." There's many other activities that will one day make it into a blog post, such as using themed surveys to ask and answer questions, re-telling short animated clips, using News 2 You, and modifying traditional games like bingo and go fish to target functional communication and intelligibility. Stay tuned for more ideas for working with this population in the future!

Wrap-Up/Reward/Transition ~ 1 - 5 minutes
With my higher-functioning classes, we always do a quick wrap-up to discuss what we were targeting that day - such as new vocabulary, explanation skills, good speech skills, social skills, etc. This is an important part of any session, but I actually forgot to implement a wrap-up with my Mod/Severe students until this year... whoops! They need the reminder of what they were working on as well!

You may also have some students/classes that need to be working for a reward. I typically implement a short, funny video as the reward since it can target an entire class and be over within 60 seconds or less. Popular google searches for appropriate and enjoyable videos include "dog dancing," "funny cats," and other animal-related videos. I also try to schedule my sessions at the end of a class period so that when my session ends, the students are ready to transition to their next classroom or activity. I feel like this gets some teacher buy-in as well, because the students are completely finished with an activity and are generally willing to transition with little difficulty.

I think the key take-away in planning sessions for the Mod/Severe population is to always try to plan for any crazy thing that may happen and to then have some sort of back-up in mind! Behavior issues? Have that visual schedule, Class Dojo, or reward system ready to go. Session not going well? I keep the students' favorite Matt and Molly stories in my Mod/Severe therapy bag just to whip out in case things go south.

What are your favorite ideas to keep your Mod/Severe sessions running smoothly? How do you handle behavior issues or keep your students focused on your activity? Please share your ideas in the comment section!!

As always, it doesn't have to be fancy, just keep it fun and functional!
  • Jillian, the No-Frills SLP

Tuesday, September 20, 2016

General Use:"Off-the-Shelf" Materials

So I've mentioned it before, but I'll say it again: in general, I dislike most "off-the-shelf" therapy materials. If it comes prepackaged with cards, a workbook, and an instructional manual, I probably have turned my nose up at it at some point in my career. Not to say the products are bad, but in my opinion, most "off-the-shelf" products simply aren't appropriate for teenagers or they just don't target their real needs.

Of course, there are always exceptions, especially when those products are modified heavily, such as the case with my use of Matt and Molly with my Mod/Severe teens. But sometimes, it's one of those days where I just haven't had enough time to plan my next session. A group is coming in 5 minutes and I need to just yank something off the shelf and survive the next 25 minutes. In occasions like these, I reach for a few special products that hold a dear place in my heart. I tend to use them as intended, but modifications are almost always at the forefront of my mind...

Language:

Jeepers Peepers or Headbanz (same game, I recommend whichever one you can secure funding for)
Hopefully you've all heard of this game before, or maybe you've heard of it but dismissed it as not appropriate for teenagers. Whatever the case, this is one of those games that should be in your arsenal. The premise is that each student has a card on their forehead that they can't see. The game can play out in a few ways:

1) The target student must ask yes/no questions about their card: e.g. "Am I an animal? Am I a tool?"
2) The target student must ask categorical questions about their card: e.g. "What category am I? What shape am I?"
3) The non-target students take turns providing individual descriptions of the target player's card: e.g. You are a silver tool with a handle used at home by mom and dad.

Depending on your students' goals, one method can be employed for the entire game or each student can use a different method. You can easily target goals like asking/answering questions, explaining, using complex grammar, etc.

The cards that come with the games are OK, but I have made a few specific cards with updated images (since, for example, some of the Jeepers Peepers technology images are very old).

Blurt!
Now I own a very, very old version of this game (as in I got this game when I was 9... so 16 years ago!), so perhaps the new game has a few differences I'm unaware of. But looking on Amazon, this latest version looks more or less the same.

Essentially, Blurt! is a combination vocabulary and memory game. The vocabulary that students will be asked to generate is not complex or difficult, but speed is the key to playing the game and if your caseload is anything like mine, you've got some students with dreadful word retrieval issues. Students take turns reading short descriptions (e.g. "A flat moving part that sticks out from the body of a fish,") and the first student to provide the correct answer wins a point.

You can play this game in several ways:
1) You read the descriptions and all students answer,
2) Students take turn reading one description at a time (use a die roll to select the number or just read the next in the line),
3) One student reads 2 - 6 descriptions in a row before moving to another student.

Lots of accommodations can be made for this game:
- A list of unfamiliar words is generated as a group
- After a pre-selected amount of words, students use and/or write a selected word/s in a sentence
- You provide the each student with a word and they generate their own description (after playing for awhile so they have some examples of what the descriptions are like) to test out on the group

Social Skills/Thinking:

Should I or Shouldn't I - Middle and High School Edition
Praise be to Michelle Garcia-Winner for the creation of this amazing game. I have used this game with my highest level Mod/Severe class and kids on the spectrum of all varieties - you will definitely get your money's worth if you work with any students with autism!

The game comes with a wide selection of scenarios, which I have since organized into categories like "conversations," "naivety," "manners," "college/job, 'etc. so that I can select specific cards for each group. The game starts as you read the selected card and students pick whether that scenario is:

1) Will give people good thoughts!
2) Is just fine, OK
3) Will give people weird thoughts...
4) Will annoy people...
5) Is against the rules!

Students are given a deck of cards from 1 - 5 so they can vote secretly and all reveal their choices together. After revealing, engage your students in discussion about why they selected their answer and what the consequences could be from engaging in that behavior. I have been very surprised by my students' answers; the game really highlights areas of weakness and strength for our students' social behaviors.


Bubble Talk
I picked this game up at a Goodwill for $2 this summer and BOY am I glad!! This game has been an absolute hit with my social thinking groups - so much so that we've struck up a deal to "work one week then play the next week" and alternate playing of this game every other week. Which is fine by me, because although they think they're playing, we're really targeting some great social thinking skills!

This game works a bit like Apples to Apples: a picture card is placed in the middle and each student selects a "bubble" card from their hand. This "bubble" card symbolizes something that a character in the picture card is saying... meaning that in order to play a successful, humorous card, your students will have to take the perspective of the characters in the picture!! After we all lay down our cards, I ask each student to explain who would say that in the picture and why their card is funny. It's great insight to watch them either give a great explanation or completely fail to understand what the character could be thinking or feeling.

In the end, we all end up laughing a lot. Sometimes we take extra time on specific cards where students are having difficulty and sometimes we spend extra time celebrating a student who plays a legitimately funny card. It's a good time all around - I highly recommend getting a copy!

Artic:
 

Artic Attack /r/ and /s/ and /z/
It seems to me that sooooo many articulation materials are made for the under 11 set! My teenagers are no longer amused by "Artic Flips" and coloring pages, and they have played more games of /r/ Go Fish than you can count. Don't even mention bingo or Chipper Chat. Don't even go there.

So what's a high school therapist to do? I ordered these great books with some Medi-Cal money last year and they're already proving to be invaluable. Artic is my LEAST favorite type of therapy and these books make it a little less painful when dealing with a group of 3 unruly 14-year-old boys who exhibit minor /r/ distortions (AKA boys who are leaving my caseload come their annual IEPs!).

These books are organized according to Pam Marshalla's hierarchies - you know, /or/, /ire/, /air, /er/, etc. - and different s-blends and word placements. For each context, there are 4 different games (tic-tac-toe, battle ship, etc.) that you can use to target specific /r/ and /s/ contexts that remain troublesome into adolescence! And chances are, these are games that have not yet been played-to-death in middle and elementary school! And you can print them out and send them home for homework! I haven't yet come up with modifications for these yet, let me know if you think of some new ways to use these games!

Fluency:
So I did my best to try and think of an "off-the-shelf" material I use with my students and... I don't think I do! I highlighted some therapy ideas in my previous blog post on fluency, but something that I might pull out of my tool bag at the last minute is watching and discussing videos by comedian Drew Lynch (who happens to be a young adult who stutters)!

My favorite stuttering-related videos are:
1) Why My Stutter is Getting Better
2) I Try to Cure My Stutter
3) How to Deal with Bullies

But really, there is something valuable in nearly all of his videos. Remember, the same rule applies as when showing students any media: watch each video ahead of time to verify that it's OK for your students (he does talk about dating and more mature subjects in some videos). I suggest introducing Drew by watching his America's Got Talent audition to highlight his great attitude of not letting his fluency disorder get in the way of his dreams.

I hope you've gotten a few new ideas of what to keep on your shelves to help out in those last-minute pinches! Comment below with your favorite quick fixes, I'm always looking for ways to keep things simple and effective! And as always, it doesn't have to be fancy, just keep it fun and functional!
  • Jillian, the No-Frills SLP

Wednesday, September 7, 2016

Higher-Level Language: Developing Critical Listening and Self-Advocacy Skills Part 2

Welcome back everyone! If you haven't checked out last week's blog, please do so before reading this post! You can find it here.

Last week, I started talking about ways to target our Speech-Language Impaired (SLI) or Specific Learning Disability (SLD) students who struggle to comprehend auditory language presented to them in their general education classes. These students are expected to take notes on what the teacher is saying and too often they resort to only copying what they see on the Powerpoint or on the board. Last week I went over the foundations for understanding what we're targeting when we look at auditory processing and critical listening skills in addition to some goals we might write for students that fit this profile.

This week, let's dive into the nitty gritty of therapy and how to target the development of these very important skills! Depending on the group's size, needs, and skill level, my lessons on critical listening have lasted anywhere from 2 - 4 weeks. For the purpose of the blog, I've broken the lessons down into 3 weekly sessions; however, as with everything, these lessons should be modified and extended/shortened depending on the level of the students!


Lesson 1: What is Self-Advocacy?
    ~15 Minutes – IEP Accommodation Worksheet
1)   Provide students with copies of their accommodations page and an IEP Accommodation Worksheet

2)   Work with your students to identify what each accommodation means in plain language. Ask each student to select (or you select if you know that they have certain accommodations for a specific class) a class and complete the graphic organizer (maybe even laminate it, as I have done for some students). Make sure you make a copy or take a picture of it because some students may lose it and it will be used in future activities!

3)   Explain to your students that they must explain their graphic organizers and take ownership of their needs. They are in high school now and they must advocate for what they need to be successful.

     ~10 Minutes – Practicing the IEP Accommodation Worksheet Script
1)   Discuss what the most important information is on their worksheet. Is it their extended time on tests? Is it copies of notes? Prompt the students to come up with what is most important to them. Make a list of the most important accommodations in ranked order; I believe that students should focus on explaining their most pressing needs instead of trying to go through the entire worksheet with their teachers. Give a model for how you would explain a set of hypothetical accommodations.

2) Time to role play! You now take on the role of their classroom teacher - it helps to physically move away from the group and sit at your desk like their teachers would. Have them practice walking up to you, gaining your attention appropriately (a weakness for so many of my students!), waiting if necessary, and then explaining their key, most important accommodations. This is a a great opportunity to employ video modeling if students are struggling with this. It's also a good tool to go back and watch their explanation and identify areas of weakness.

3) Practice, practice, practice! Have each student take as many turns as time allows so they can get multiple opportunities at explaining their needs. Depending on the level of student need, I might take another week to review video models and gain more practice with this skill. We might even go on a field-trip to another classroom to try approaching a teacher who is on their prep period to practice.

Lesson 2: Let's Apply Critical Listening in the Classroom

     ~5 Minutes – The Bus Riddle
1)   Provide students with paper and pens and tell them to take notes without further guidance or prompting. Show the “Bus Riddle” and read it aloud or just read it if technology access is limited.

2)   Elicit answers to the riddle. Prompt as needed to elicit the correct answer.

3)   Discuss why coming to the correct answer was difficult and make connections to their classroom note-taking expectations.

     ~5 Minutes – Accommodations Tie-in
1)   Have your students pull out their Classroom Organization graphic organizers that were completed the week before. Specifically highlight the “note-taking section” and ask your students to identify if having a copy of the bus notes would have been helpful (or having a scribe, etc). Discuss why actively utilizing their accommodations will help them earn better grades. Also ask your students if any of them have tried to explain their accommodations to a teacher and reward those who have,

   ~5 Minutes – Teacher Signals
1)   Generate a list of things that teachers do to indicate that what they are saying is important, such as:
a.     Saying “This will be on the test!”
b.     Raising their voice
c.     Asking questions of the students
d.     Writing information on the board

2)   At this point I solicit information from the class regarding which of their teachers they believe lectures instead of just reading off a PowerPoint. Sometimes the students are under the impression that their teachers don't really lecture (when I know for a fact from classroom observations that they do). It's often hard for our students to realize that the information that the teacher is providing verbally may not actually be what's on the slides!

     ~10 Minutes – Practice Lecture
1)   By this point, I can tell that the students are only barely grasping this concept. Perhaps in theory they get it, but it reality... not so much. Time for a real world example! I pull up this PowerPoint that I found on-line that is a companion to a US History textbook. I ask my students to take notes like they do in class. There will be a quiz on this material next week, so take the best notes they can. 

      I skip down to slide #25 and begin to lecture on this slide as if I was their US History teacher. The information is fairly basic, but instead of merely reading off the slide, I provide real-world examples for each vocabulary word, and my own definitions. I talk about Martin Luther King's "I Have a Dream Speech" - would it be a primary or secondary source? Is it authentic? Reliable? Biased? How would we know? What does interpreting evidence mean? I talk about crime scenes and detectives and how historians are, in a sense, detectives. Essentially what I'm doing is providing them with a wealth of information that is not provided on their slides - information that will be helpful when they take their "quiz" the following week. At the end, I collect their "notes" to ensure I have them for the next week.


Lesson 3: Critical Listening Wrap-Up
    ~5 minutes - Time for a Quiz!
1)   I hand out the notes the students took on the history PowerPoint. For nearly all my  students, these notes are just the PowerPoint they copied down while I was talking without any additional examples or commentary from what I spoke on. I put 7 minutes on my timer and then give them a "quiz" with these questions:

           a) What is a primary source? (They can answer this one with the information from the ppt)

           b) What is an example of a primary source? (They would have this answer in their notes if they were critically listening and documenting my examples during the lecture... but since they merely copied, many have struggled with this question)

                 c) What does it mean to be biased? (Another answer found in the notes)

                 d) How might historians be biased? (I gave them this answer in my lecture
           but not the notes!)

      ~5 minutes - Quiz Discussion
1)   Next, we discuss how it felt to take that quiz and we review the correct answers. Which questions could they answer easily? Which questions were harder? Which questions required rote memorization? Which questions required critical thinking? Were all the answers in the notes? If not, how could you have gotten that information (Answer: critical listening!). Have you felt this way on other tests before? What can be done differently to ensure more success in the classroom? This is also a time where you can discuss asking Closed and Open questions (if you've already talked about this concept) and how teachers might provide open question answers vs. closed question answers found in the notes. I also take this time to model how to generate questions that you think might be on a test based upon notes.
   
      ~10 minutes Model Notes
1)   Now in order to help cement this process, the students have to practice. I return to the PowerPoint used previously and go on to slide 26. I lecture just as I did on slide 25, adding information, examples, and my own definitions to augment the information included on the slide. But this time, I assist the students in their note taking and model what key elements should be written down and how to structure it on a page to make it easy to follow for later review. This process alone may be extended into another session if I feel the students need even more practice.

      ~5 minutes - What next?
1)   I ask all my students to select one class where the teacher lectures and make that their "focus" class. This class will be their test run in critical listening - can they focus on taking good notes while paying attention and documenting what the teacher is saying? A good choice for this focus class might be a class where they are given copies of the notes or where the notes can be accessed later on a teacher's website. In the future weeks, I check in with these students about how this focus class is going and whether or not their quiz/test grades have improved.

I hope this two-part series on addressing the need to develop critical listening skills has helped you to examine the goals of your students, develop some news lessons, and think critically about how as SLPs we can are in a great position to set them up for success in their academic classes (and in the future!).

As always, it doesn't have to be fancy, just keep it fun and functional!
  • Jillian, the No-Frills SLP

Wednesday, August 31, 2016

Higher-Level Language: Developing Critical Listening and Self-Advocacy Skills Part 1

What Do You Mean You "Weren't Listening?!"

How many of you found yourself in a general education classroom watching your students and thinking to yourselves, "What are you doing??" You see them zone out, miss information, get on their phones, and write down only what's on the board and not what the teacher was saying. You think to yourself, "When I was in school, the teacher couldn't say two words without me analyzing their importance and writing down what was meaningful!"


But alas, our students are not us and there they sit… often feverishly copying the board or staring out the window. It drives me nuts to see students copy an entire PowerPoint word-for-word and devote so much mental energy to the task of copying that they miss the entire spoken lecture - especially when many of them have accommodations in their IEP to receive copies of PowerPoints or have note-taking assistance!!

But how many of our students are actually aware of their IEP accommodations? How many can self-advocate for their use? How many students miss assignments or turn them in half-complete because they failed to get all the instructions? And how many come to high school ill equipped to decipher what is important and what’s not over the course of their school day?

Join me for a two-part series as we look at students who fit this profile and how to help them make the most of their IEP accommodations, understand the concept of "critical listening," learn to become self-advocates, and change their note-taking habits.

Let's Try a Riddle!

Before we get into the nitty-gritty of lesson plans, let's examine the basis for why we want to cover critical listening and self-advocacy skills. Let's also examine how good we are at listening critically. As an activity, I ask my students to watch this riddle as I read along with it and ask them to take notes on what they find important. Try your hand by watching this YouTube video below...


Did you get the correct answer? Or had you forgotten the beginning of the riddle by the time you reached the end? If it stumped you, you’re in good company! Essentially none of my students write down the statement "you are a bus driver" and instead, they’re immediately drawn in to the “facts” of the numerals that follow. It mimics their classroom behavior of stressing to copy down the “facts” that could easily be located in their books instead of the instructions or analysis that the teacher is likely providing verbally.

Students have gotten defensive with me, saying things like, "You never told us the color of the bus driver's eye!!" Their emphatic frustrations remind me of the conversations they have with their teachers after failed tests... "You never told us why the Holocaust is meaningful to life in the 21st century! It wasn't in the notes!! Not fair!!" And you bet that throughout the unit on the Holocaust, the teacher was verbally making ties to life in the 21st century that our students failed to write down (because they weren’t included with the “facts” in the PowerPoint).

Our students with auditory processing and language disorders generally struggle with taking in the auditory stimulus of the teacher talking. On the other hand, writing down notes off the board or PowerPoint (and in doing so, tuning out the teacher's lecture) is often something they can do easily. It may be scary and foreign to them to take a break from the rote copying and focus on what the teacher is actually saying.

Riddles like the example above help to highlight the fact that while solely copying down information may be the key to success in certain classes with certain teachers, it will hinder them in other classes where they are expected to take notes on the information the teacher is presenting verbally. These skills are also essential for college and can easily be incorporated into transition plan goals.

And now as high school students, they must be prepared to inform their teachers of their needs. Their teachers work with 120+ students a day and they need to understand what is expected of them. I've noticed that many teachers seem to respond more positively when the student themselves tells them "I need to re-take this test because I got less than a 60% and it's written in my IEP," instead of hearing it from a SpEd staff member and feeling as if a colleague is creating more work for them. 

So the take away this framework should be straightforward: As SLPs, it's our job to encourage the development of critical listening skills and encourage our students to stand up for their needs!

So how do we get started on that lofty task? Goals, of course!

Goal Ideas for Critical Listening

Goals are always my starting place for designing therapy units, activities and teacher consultation strategies, so writing authentic goals is something about which I’m deeply passionate. Here are some ideas for goals I might write that target critical listening activities and self-advocacy skills:


- Receptive Language Goal Ideas (Auditory Comprehension)
   By 10/17, given verbal directions and a prompt, Bobby will demonstrate understanding of 3- to 4–step classroom instructions by repeating and/or rephrasing them to his teacher with 80% accuracy in 4/5 opportunities as measured by SLP and/or teacher data.

- Expressive Language Goal Ideas (Self-Advocacy)

   By 10/17, Bobby will independently provide an IEP Accommodation Worksheet to his teacher, verbally provide 2 reasons why it must be followed, and provide explanations for 80% of his classroom IEP accommodations as measured by teacher report/SLP observation.

- Transition Goal Ideas (College Awareness)

   By 10/17, given minimal clinician assistance, Bobby will identify 3 note-taking and/or critical listening strategies that will lead to success in college-level courses as measured by student work samples.

As you can see, the development of critical listening skills and self-advocacy can be applied to a variety of student needs. I'm sure you all can think of some other awesome goals that target these skills as well!

Join me next week for a continuation of this series - including two lessons plans on engaging critical listening and self-advocacy skills! And as always, it doesn't have to be fancy, just keep it fun and functional!

  • Jillian, the No-Frills SLP

Wednesday, August 24, 2016

General Use: First Day Goal Setting Activity

As many schools are heading back into the thick of it, I'm sure many of you are thinking about what you want to accomplish in your first session with your students.

Here are some goals I strive to accomplish with all my students in the first session:

1) Introduce all group members and establish some common interests or preferences,
2) Build relationships by learning new, personal information about both my returning and new students,
3) Build relationships by letting my students learn new information about me,
4) Discuss communication goals and why they are important,
5) Set personal goals for my students' academic and personal success,
6) Understand what my students are concerned about for the upcoming year.

That may seem like a lot to accomplish in one 20 to 30 minute session - especially when there are 3 or 4 students in a group! But in my opinion, there's nothing more important than starting the school year off on the right foot.

I start this process by beginning each year with a Communication Goal Setting Worksheet and Communication Contract, which you can find at my TPT store here:
https://www.teacherspayteachers.com/Product/Communication-Goal-Setting-Worksheet-for-SLPs-2747406
Communication Goal Setting Worksheet (for SLPs)
Students are given an opportunity to discuss their communication goal - I read a student-friendly version of the IEP goal/s to them. I encourage them to tell me what they think of the goal/s; do they think it will help? Does it seem too hard? Too easy? Do they have something else they would like to work on?

Next, I elicit a personal goal the student wants to achieve this year. Some real goals I have encountered have included: getting better grades, getting a job, making new friends, making a sports team, getting more subscribers for their YouTube channel, getting a girlfriend, getting a driver's license, and getting no detentions. 
We then discuss how their communication and personal goals are related. Sometimes a lot of creativity has to be employed, but I always drive home the point of how working on their communication goal will help them attain their personal goal. For example...
  - Will learning to take the perspective of others help you make more friends?
  - Will developing your summarizing skills help you study for tests and get better grades?
  - Will developing your explanation skills help you when you get in an argument with your parents?
  - Will learning about stuttering reduce your anxiety and help you talk to the girl you like?
  - Will becoming more understandable help you when you interview for a job?

If the student's communication goal cannot (even creatively) be applied to their personal goal, I highly suggest thinking about why they are working on that goal in the first place. If the goal is not meaningful to the student, then they have no incentive to actually work towards improvement!! Student buy-in is EVERYTHING.

After discussing goals, I have a space on the worksheet to identify strengths and weaknesses. Strength identification obviously helps me get to know my student, but sometimes it can tell you even more than that. For example, just last Monday I was working with a sophomore and two freshman with language delays in our first session.All three were unable to generate a single thing they were good at. I had to do some modeling and extreme prompting to finally draw out a single positive trait from each of these students. Next, of course, they all identified 3 - 4 classes and modalities (e.g. math, writing, reading, and science) that they anticipated would be troublesome this year.
What did that experience tell me?

I learned that this group consists of the type of students who are used to failing, being confused, and labeled as under-achieving students. They don't see themselves as smart, creative, or even good at non-academic tasks like sports or games. This activity informed me that with this particular group, I would really need to employ the "Oreo" strategy of sandwiching a hard task between two easier tasks in order to build their confidence. In contrast, for other groups where the students could easily list 5 things at which they excelled, the "Oreo" strategy may not be as important.

My last question on the worksheet asks the students to write down why improving their communication is important. This is one last way I try to drive home the point that what we cover during "communication improvement" (I hate using the word "speech" for what we do with high schoolers!) matters to them for a real, tangible reason. They don't just come to me because they "have to." Maybe they don't particularly enjoy practicing their auditory memory strategies, but at least they know why they're doing it!

After learning a lot about my students, I also like to include some fun facts about me in order to grow our relationship. I have a PowerPoint I created that lists some facts about me with the answers hidden underneath. The students guess the answers and some of them are surprised to learn we have some things in common, such as favorite TV shows, music, and video games! I also include a picture of myself when I graduated from high school because the kids seem to LOVE seeing teachers when they were their age. I always get a "That was YOU?!?" from at least one student in every group, it's great.


------------->

------------->


The last part of the session consists of a contract that both the students and I sign. It outlines the guidelines that I want them to partake of in my room - I want them to do their best, have an open mind, know their goals, and recognize the important of good communication skills in their lives. I think this contract sets the mood for the year as well; my students are all 14 or older and they are starting to see themselves as adults. It's only fair that I start treating them as adults, too.

I encourage you to check out the worksheet and the contract combo for free at my TPT store here and modify it to your needs and the needs of your students! I hope your first week/s of school are off to a great start!  

As always, it doesn't have to be fancy, just keep it fun and functional!
  • Jillian, the No-Frills SLP

Wednesday, August 17, 2016

The Mod/Severe Population: Matt and Molly, Not Just For the Littles!


        Last year when I was taking stock of all the things I inherited from the previous SLP, I noticed a wide assortment of Matt and Molly kits, which you can find at LinguiSystem's website here. Matt and Molly kits consist of sequences of 4 pictures that use stick figures to explain daily activities, interactions, and themes (e.g. seasons, animals, etc.) that come with pre-scripted sentences to say about each picture. They are simple, colorful, and targeted towards working with students with Autism. They are structured to include an introductory scene, 2 "bad choices," and 1 "good choice."


        My previous experience with these sets of pictures had been in grad school where I used them with young children. I wondered to myself, "Why are these here at the high school?" Every single one was still in the shrink wrap, so I knew the previous SLP hadn't even attempted to use them. Maybe they were sent to the wrong school? Maybe she ordered the wrong item? There were certainly other very juvenile items in my room; I was tempted to toss them in the pile of items I didn't want. But they weren't that juvenile - Matt and Molly are drawn so vaguely that they easily could be viewed as pre-teens and the situations they find themselves in are not only applicable to small children!

        I had an idea. Many of the students in my Mod/Severe classes fit the cognitive profile of the target audience for Matt and Molly - why not develop use of the Matt and Molly stories for my exceptional learners?

Matt and Molly Are Secretly Teenagers

       I quickly learned that not every Matt and Molly sequence is appropriate for the adolescent Mod/Severe classroom. I removed the sequence that involved hand-holding when crossing the street (because we teach other strategies for street safety). I removed the sequence that taught how to hug relatives (because I believe all of our kids should be allowed bodily autonomy and not be forced to hug a relative if they don't want to). I removed a few other stories that were just plain silly and too immature for teenagers.

       But what did I find was appropriate? I discovered a sequence on using a tissue and not your sleeve - an issue that plagued the classrooms for weeks this winter. I tweaked several sequences about how to ride the bus. There are sequences for standing in line, touching dogs, interacting with guests, and greeting someone at the door. I realized that, even though they are made for young children, my students still needed to work on these life skills! In fact, Matt and Molly are sometimes so willfully defiant that I really think the creators modeled them after teenagers!

What Does a Matt and Molly Lesson Look Like?

         Every session with my Mod/Severe classes begins with a reminder of the rules, which you can find in my TPT Store here. Nowadays, my students are very familiar with Matt and Molly and will call them by their names. But on the first day, I introduced them as "new friends" and described them as teenagers who sometimes make bad choices. I told my students that Matt and Molly needed their help to figure out good choices.

         I laminated cards with a green "yes" and a red "no" on opposing sides. I instructed my students that after Matt and Molly make a choice, they will be asked to hold up their cards and vote on whether Matt and Molly are making the right choice. This is the main way my non-verbal, poorly engaged students are involved in the lesson. My verbal students also use the cards to vote, but in addition they are asked WH- questions about better choices. A few of the highest students can give explanations of why the poor choice is wrong.

        After introducing Matt and Molly, I reveal the introductory picture. In one classroom, there is a document camera I can use to project the image onto the SMARTBoard. In other classes, I assemble the students together in a group and show them the actual picture.

        When "telling the story," I never use the pre-scripted sentences that come with the sets because they are not language-rich and written for an audience of small children. Rather, I construct my own version that typically includes more details, target vocabulary, and appropriate conversational slang. I identify other characters in the picture (e.g. mom, dad, grandpa) by their name or I may ask students to make a guess who is in the picture.

       For example, in the example below, I asked my students to look at the character's height, dress, and haircut. Does this look like Mom? Why can't this character be Dad? (Lessons in my Mod/Severe classes are, unfortunately, not the best place to combat gender stereotypes based on appearance!). Typically my students require quite a bit of prompting, but understanding why this character can't be Dad targets important critical thinking skills.

In this sequence, we see Molly attempt 2 poor choices - grabbing the music and pulling hair - before coming up with the correct solution of getting her own headphones and music.

      For each picture, I ask the students some WH- questions. For example, the above pictures might elicit questions like "What does Molly see?" "Who has the headphones?" "Where is Molly's hand?" The Matt and Molly drawings also explicitly target emotions - I might ask "How is she feeling?" and point to Molly's friend's mouth as a cue to elicit the response that she is angry or happy.

      Continuing on in the progression, I typically reveal the second picture to be a bad choice although you can present the pictures in any order. The students generally find the poor solutions to be hilarious and will burst into laughter when they see Matt and Molly engaging is poor behaviors. For example, when Matt blows snot into his sleeve, they giggle and point at how silly Matt is. They, of course, need prompting to make the connection that that they too blow snot into their sleeves on a daily basis!

      After explaining the choice Matt or Molly has made, I ask more WH- questions and attempt to elicit explanations of why the choice was not a good one. At the end, we conduct a class vote and tally the number of "yes" and "no" on the class white board. Sometimes, the teachers then use these numbers in their math lessons to construct simple graphs and pie charts to demonstrate the concept of "most," "more," "less," "few," etc. (e.g. "Most people in the class thought Matt made a good choice!").

         At the end, you can also ask students to sequence the story themselves. Sometimes I ask students to stand in the front of the class and hold individual pictures in order to sequence them as a class. I have also contemplated scanning the pictures and shrinking them down to the size of a 3 x 5 card for each individual student to sequence at their desk, but I have not done this yet. Something to work on this year! It's also fun to ask the students to role play the situations - proper nose blowing and line forming work well for this activity!

         During a typical 30 minute session with 6 - 8 students, I use 2 or 3 Matt and Molly sequences. However, it would be possible to fill an entire session with 1 sequence if you conducted multiple different activities involving the same sequence.


Modifications
 - For my students with limited verbal abilities, I created conversation sheets with key icons that relate to the story. You can find an example here at my TPT store - it correlates to the "Hungry Turkey" Matt and Molly sequence found in the "Fall" set (see the picture above).
 - My students with AAC use their devices to comment and answer WH- questions. This year, my goal is to provide the para-educators with a vocabulary list ahead of time so they can program relevant vocabulary into students' AAC devices.
 - My students with intelligibility concerns use their strategies (explained here) when answering questions and practice target words related to the story (e.g. choice, stop!, rain, etc.)

       If you don't have access to "official" Matt and Molly materials, I would highly encourage you to make your own! The key takeaway here is that the students seem to really respond to simple drawings with relevant stories told in an interactive way. They love participating by voting and correcting me when I "accidentally" praise Matt for a bad choice! It doesn't have to be fancy, just make it fun!

As always, it doesn't have to be fancy, just keep it fun and functional!
  • Jillian, the No-Frills SLP


Wednesday, July 6, 2016

Social Thinking: Video Modeling With Adolescents

Ahh, don’t you just love working with our social thinking students? You know the ones...
- The student whose conversation topics consist of silverfish and skeletons,
- The constant “blurter” who insists he’s always right,
- The girl who constantly picks at her ear and then smells her ear wax for sensory feedback,
- The kid who will stare at you for five minutes before realizing you’ve been waiting for him to ask “How was your weekend?” back to you,
- The 14-year-old who crawls under his desk when he’s bored.

These students often provide us with the best stories to share after work because they’re just such unique individuals! But as therapists, we don't seek to remove or kill that individuality; rather we want give them some skills that they can use to navigate the real world and understand how they can be more successful when interacting with peers, teachers, and adults. But, that's easier said than done, of course! In this blog, I'm going to highlight one strategy I have used with social thinking groups, but please comment what strategies you have used that work for your students!


Sally, Please Don’t Smell Your Ear Wax

Back during my internship in a middle school, I began working with the first 3 students I described above. Once a week, they’d come somewhat hesitantly: either they believed they had no problems and did not belong in my social thinking group or they were so acutely aware of their “weird” status that talking about it made them uncomfortable. A typical session consisted of the group (attempting) to discuss a social thinking worksheet while…


  • The silverfish student insisted on discussing silverfish while he drew skeletons in the margins of the worksheet.
  • The lone girl in the group quickly pointed out the others’ “weird behaviors” but failed to recognize that smelling her ear wax is a prime example of oddity and social faux pas.
  • The “blurter” interrupted everyone, all the time, to make a “more intellectual” comment and remind the group of why he didn't need to be there.

I quickly realized that these students were PROS at picking out the “weird” behavior in others. Identifying strange behaviors in a Mr. Bean video? Nailed it. Recognizing that Sheldon from the Big Bang Theory is being self-centered and not thinking of others? No problem! How could these students be so observant when watching other people but be totally incapable of identifying their own unexpected behaviors? I decided that the strategy of video modeling had to be attempted to incorporate real-life examples.


Ms. Hall, Are You Going to Put Us On YouTube?

For those of you who may be unfamiliar with premise of video modeling, I'm not going to go in-depth with the concept of video modeling here, because that could easily cover several posts! If the concept is new to you, I highly encourage you to make a free account with Autism Internet Modules and check out their module on video modeling (as well as all their other great modules!).

As an aside, you should double-check with your school about their policy on recording students before you engage in video modeling. At the 4 schools I've worked at in two different districts, all required parents to sign a release stating that they consent to photos and videos of their students being taken for "school purposes." I don't think you should have an issue with video modeling at most public schools, especially since you will be deleting the video after watching it with the students!


So, here’s what happened with my group when we tried video modeling...
Camera, Iphone, Ipad, Icon, Symbol
I had only an iPad at my discretion to use as a recording device, so I set it up discreetly on a back table in a manner that would still record all three students. It wasn’t perfect, but it worked. I called for my students to come from their classes and hit record. We carried out a typical session and, as usual, each of the students engaged in some pretty unexpected behaviors.


For the next session, we watched the video I had recorded in secret the week before. I knew ahead of time that watching and discussing the video alone would not be enough - inevitably we'd get off track and it would turn into a session of each student trying to label the others as "weirder." In order to create structure for the session and access information through multiple modalities, I decided that I needed to develop a worksheet that each student could complete as the group worked through watching the video. 

You can find that worksheet available for a free download here at my Teachers Pay Teachers store.
 
 I found the session to be fairly impactful. Although the students were already aware that they engaged in unexpected behaviors once in awhile, watching how frequently they did something unexpected on the video seemed to really surprise them. For example, the female student who smelled her ear wax has no clue how frequently she engaged in the behavior. While completing her worksheet, she came to the conclusion on her own that she needed to rely more on her scented erasers to meet her sensory needs. She had been trying to phase out using her scented erasers because she was "too old for that now;" but upon realizing that her ear wax smelling habit was far more unexpected, she conceded that the scented erasers weren't actually so bad!

For the student who couldn't help but blurt, we kept a tally of every time he cut off another person from speaking and we analyzed the facial expressions and body language of those he had cut off. While not entirely convinced that his blurting had been unexpected, he did identify on his worksheet that it was clear that his blurting hurt others and made them feel unimportant. With some subtle suggestions, he decided that his replacement behavior would be to write down what he wanted to say on a piece of paper and at the end of the session he could state one thing that he had been unable to say during the session.

Overall, the students seemed to enjoy watching themselves and realizing just what they looked like when engaging in unexpected behaviors. I did have to very firmly steer the conversation away from comments like "But he's weirder," so be ready to jump in and have a firm hand to guide the conversation. We ideally want students to come up with their own solutions, but the amount of cueing and conversational steering needed will definitely vary from student to student.

Finally, don't forget to delete your video as soon as you watch it with the students! Discretion with recorded materials is always best - you don't want to accidentally upload your students onto a cloud service! 

I hope this explanation of how I have used video modeling has been helpful. There are lots of ways to incorporate video modeling into your sessions (e.g. with fluency students to demonstrate hard stuttering versus easy stuttering), so get creative and let me know how it goes in the comments!

As always, it doesn't have to be fancy, just keep it fun and functional!

  • Jillian, the No-Frills SLP